
Showing posts with label Gallery. Show all posts
Showing posts with label Gallery. Show all posts
Sunday, March 10, 2013
Photos from Cold Wars 2013
I’m back from another very enjoyable HMGS Cold Wars convention. Here are some photos that I took at the show: Link

Sunday, February 10, 2013
The Battle of Chaplin Hills (Perryville).
Over the Christmas holiday, I had some free time, so I decided to refight the Battle of Perryville. I used the Chaplin Hills scenario from the “Guns at Gettysburg Scenarios book 1, Heartland” by Paul D. Stevenson. This scenario is based on the fighting for the forward positions in front of the Union left flank. The commanders are Brigadier General McCook (Union) and Major General Cheatham (confederate). Below are a few photos from this game.
Here’s a photo of the initial setup:

The objective of the game was to hold the greater number of high ground areas numbered 1 to 7 on the map above. If you’re wondering this game was played in regimental scale using my own rule set. Each stand of troops equals 80 men.
I decided to call the game after turn seven. Besides the loss of hill 1, the union army had been split in half. To add to Union woes, General Terrill was mortally wounded on the final turn. I believe that the Union would have put up a much better fight if less of their regiments had not been green or militia grade troops. Oh well war is not fair.
Here’s a photo of the initial setup:

 |
| Initial setup: A view of the battle from the prospective of the 4th Indiana Artillery deployed on hill 5. Maney’s Confederate Infantry Brigade can be seen in the foreground at the fence line. |
 |
| Initial setup from the Union right flank. |
 |
| Turn two: Maney’s Confederate brigade attacks the Union troops holding Hill 1. |
 |
| Turn two: Stewart’s Confederate Brigade advances across the open field in the center of the table. The Union troops consisting of the 79th Pennsylvania, 24th Illinois, and 33rd Ohio fire on the advancing Confederates from the cover of a stone wall. |
 |
| The troop positions after turn 3. |
 |
| Turn four: Field’s Confederate Brigade, consisting of the 1st, 8th, and 51st Tennessee regiments arrives on the Unions Left flank near hill 1. |
 |
| Turn four: In the center of the table, Stewarts brigade begins to push back the Union regiments holding the stonewall |
 |
| Troop positions after turn 5. |
 |
| Turn Five: The combined attack of Fields and Maney’s brigades forces the Union infantry supporting Parsons Battery on hill 1 to fall back. |
 |
| Turn Five: Despite losing its infantry support Parsons Battery decides to try to hold hill 1 alone. Ready the double canister!!!! |
 |
| Turn Six: The Union center is shattered by the restless attack of Stewart’s brigade. The Union line is essentially split in two. |
|
| Troop positions after turn 7. |
 |
| Turn seven: After a bloody assault, Fields brigade manages to destroy Parsons Battery and captures hill 1 |
I decided to call the game after turn seven. Besides the loss of hill 1, the union army had been split in half. To add to Union woes, General Terrill was mortally wounded on the final turn. I believe that the Union would have put up a much better fight if less of their regiments had not been green or militia grade troops. Oh well war is not fair.
Sunday, October 14, 2012
The Battle of Queenston Heights 200th Reenactment Photos.
Hello all,
I have just finished uploading my photos from the 200th anniversary reenactment of the Battle of Queenston Heights. This reenactment featured nearly 1000 reenactors and was held on the actual battleground. This was by far the largest War of 1812 reenactment that I have ever witnessed! Around 15,000 spectators came out to see this reenactment. Taking these numbers into account, I think it’s safe to say that this event was very successful. Personally, I’m looking forward to attending a lot more War of 1812 reenactments over the next couple of years. Thanks to all the volunteers and reenactors who made this event possible. Here's the Gallery: Link


.
I have just finished uploading my photos from the 200th anniversary reenactment of the Battle of Queenston Heights. This reenactment featured nearly 1000 reenactors and was held on the actual battleground. This was by far the largest War of 1812 reenactment that I have ever witnessed! Around 15,000 spectators came out to see this reenactment. Taking these numbers into account, I think it’s safe to say that this event was very successful. Personally, I’m looking forward to attending a lot more War of 1812 reenactments over the next couple of years. Thanks to all the volunteers and reenactors who made this event possible. Here's the Gallery: Link

 |
| General Brock leads his troops just before being fatally wounded |

See my full gallery here: Queenston Heights 200th Reenactment Gallery
.
Sunday, June 24, 2012
New battle report posted- The Battle of Fair Oaks (Seven Pines)
A few weeks ago I commemorated the 150th anniversary of the Battle of Fair Oaks by refighting the Fair Oaks Station part of the battle. To date this is the largest battle that I have run in terms of table size and the amount of figures used. It took me a few weeks to put the battle report together, but final here it is. Looking forward, my next large battle will probably be the Cornfield at Antietam. In the mean time, I also hope to do some smaller 1862 battles. So be on the lookout for these starting in July.
Thank for looking.
-Bryan


Key words: ACW 10mm, American Civil War 10mm, Battle Report, Miniature Wargaming, Battle of Fair Oaks, Battle of Seven Pines
Thank for looking.
-Bryan
Battle Report: The Battle of Fair Oaks
.Key words: ACW 10mm, American Civil War 10mm, Battle Report, Miniature Wargaming, Battle of Fair Oaks, Battle of Seven Pines
Monday, April 16, 2012
New battle report posted- The Battle of Shiloh Church (Sherman’s Stand)
Last weekend, I commemorated the 150th anniversary of the battle of Shiloh by refighting Sherman’s stand at the Shiloh Church. Below are a few images from the game. The battle report can be seen here: Link


Keywords: The Battle of Shiloh Wargame, Shiloh Church, Pendraken 10mm, ACW 10mm, American Civil War 10mm, Guns at Gettysburg Scenarios, Civil War Miniatures
Keywords: The Battle of Shiloh Wargame, Shiloh Church, Pendraken 10mm, ACW 10mm, American Civil War 10mm, Guns at Gettysburg Scenarios, Civil War Miniatures
Thursday, March 1, 2012
New Gallery: The Battle of Pea Ridge (First Day, March 7th, 1862)
Just in time for the 150th anniversary here are the photos from the Battle Pea Ridge game that I ran back in January. Below are some of my favorite photos from the game. The entire gallery can be seen here: The
Battle of Pea Ridge Gallery
Enjoy the photos


Key Words: ACW 10mm, American Civil War 10mm, The Battle of Pea Ridge, Elkhorn Tavern, Syracuse Wargaming
Battle of Pea Ridge Gallery
Enjoy the photos
Key Words: ACW 10mm, American Civil War 10mm, The Battle of Pea Ridge, Elkhorn Tavern, Syracuse Wargaming
Wednesday, January 4, 2012
Battle of the Hornet’s Nest Game Gallery Added
Below are some photos from my most recent American Civil War game. The game was based on the fighting that occurred at the Hornet’s Nest during the Battle of Shiloh. The full Gallery can be seen here: The Hornet’s Nest (Shiloh 1862)
Key words: Battle of Shiloh, The Hornet’s nest, American Civil War 10mm, ACW 10mm, Rally Round the flag Rules, Guns at Gettysburg Scenarios book 2,


Key words: Battle of Shiloh, The Hornet’s nest, American Civil War 10mm, ACW 10mm, Rally Round the flag Rules, Guns at Gettysburg Scenarios book 2,
Thursday, November 17, 2011
Battle of Bull Run Game Gallery Added
I have finally uploaded my photos from the recent Battle of Bull Run game that I ran. Below are a few images from the game. The full Gallery can be seen here: http://saltcitywargamers.wordpress.com/the-battle-of-bull-run/


x


Enjoy
-Bryan
Key words: Battle of Bull Run, American Civil War 10mm, ACW 10mm,
x
Enjoy
-Bryan
Key words: Battle of Bull Run, American Civil War 10mm, ACW 10mm,
Tuesday, October 4, 2011
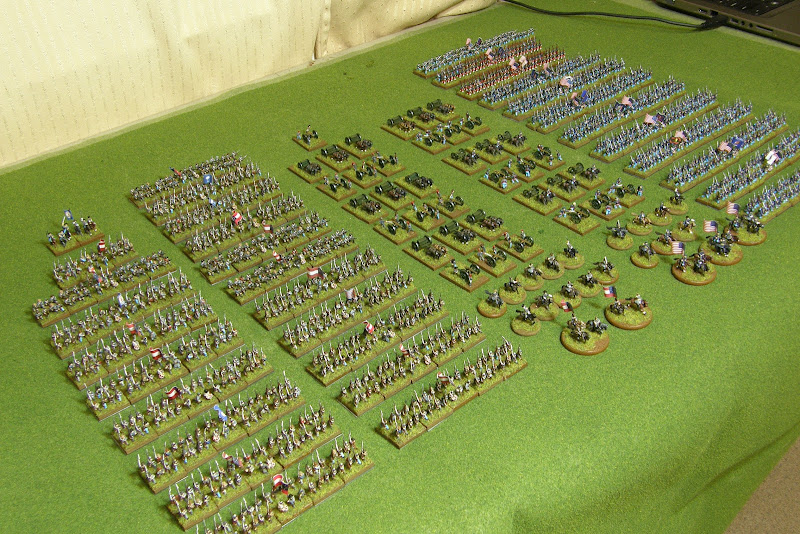
American Civil War project phase 1 completed
Phase one of my American Civil War project has been completed. My Goal for phase one was to paint enough figures to re-fight the battle for Henry House Hill (1st Bull Run). It took me eleven months (Oct, 2010 to Sep, 2011) to paint the approximant 1500 figures required to meet this goal. Over those eleven months, I successfully avoided the temptations of stating other projects and I stayed focused solely on meeting my goal. This within its self is a great achievement for me. Below are some images of the final product.
My advice for anyone starting a large project like this is: 1) If you’re in the states and plan on ordering overseas, estimate that it will take about 6 weeks to get your order. 2) Set achievable goals. Pick a small or medium size battle and set that as your goal. After meeting that goal pick a larger battle for the next goal. 3) Most important, stay focused on meeting your goal and don’t stray into other projects or periods.




Keywords: American Civil War 10mm, ACW 10mm, Pendraken
My advice for anyone starting a large project like this is: 1) If you’re in the states and plan on ordering overseas, estimate that it will take about 6 weeks to get your order. 2) Set achievable goals. Pick a small or medium size battle and set that as your goal. After meeting that goal pick a larger battle for the next goal. 3) Most important, stay focused on meeting your goal and don’t stray into other projects or periods.
Keywords: American Civil War 10mm, ACW 10mm, Pendraken
Subscribe to:
Posts (Atom)