Pages

Showing posts with label Battle Report. Show all posts

Friday, April 23, 2021

The Battle Of Iuka September 19, 1862 Mississippi (Part 1)

 Game Details:

Rules: Piquet Field of Battle, 3rd Edition

Scenario: "Iuka" from the book "Rebel Yell, Yankee Hurrah!" by Potomac Publications

Game Scale: Regiment -  1"=40yds (apx.)

Figure Scale: 10mm

Table Size: 5'X5'

Table Overview:
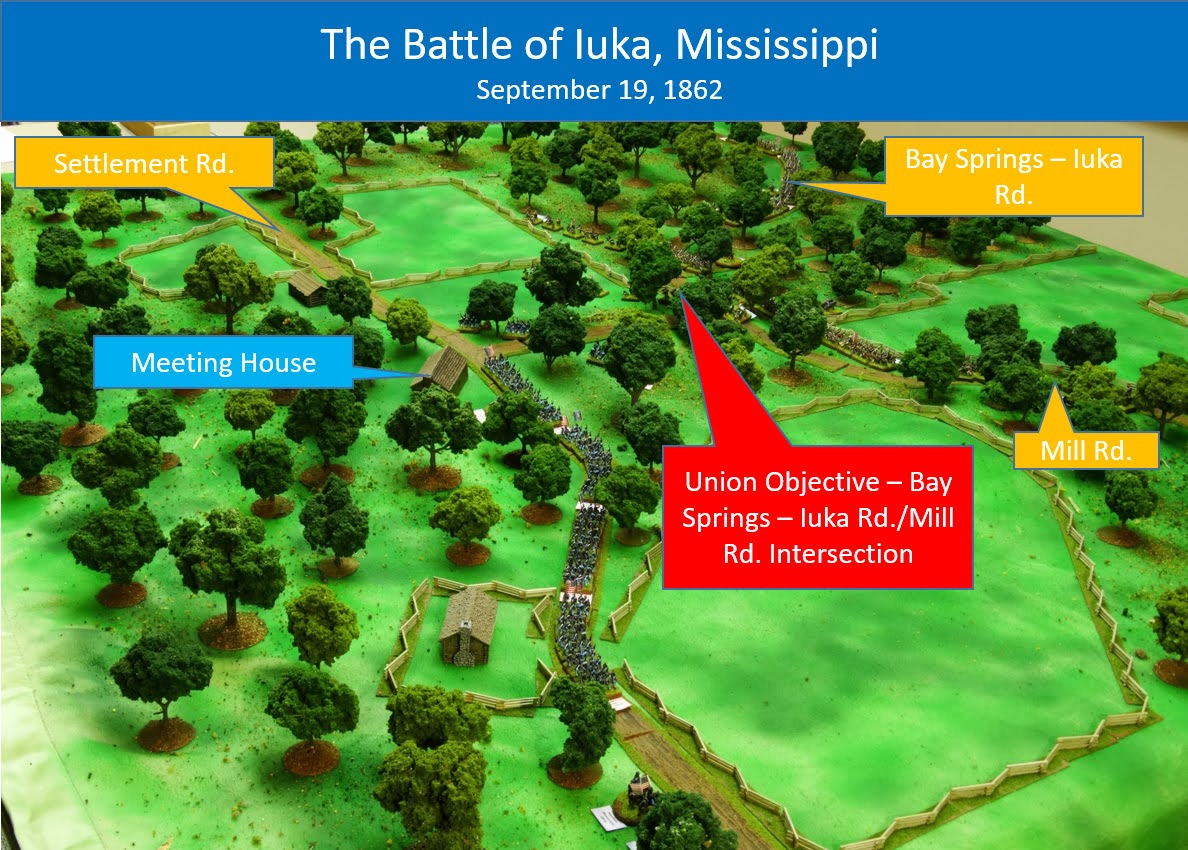

Game Length:  4 p.m. to 6:45 p.m.

Victory Conditions: The Federals Must Possess the Bay Springs-Iuka/ Mill Road intersection at the end of the game. The Confederates must hold the intersection. Anything less is a draw.

Initial Setup:

test

Initial setup from the Federals Side of the table.


Initial setup from the Confederate side of the table.

Brig. General Louis Hebert oversees the placement of Clarks artillery battery on the Bay Springs-Iuka/Settlement Road Intersection. This Intersection is the Union's objective for the game. 


Turn 1 (4:00 - 5:00)

4:00 - 4:20 | On the first Union movement card, division commander General Charles Hamilton is forced to take personal control of Sanborn's Brigade after Col. Sanborn rolls a one for movement. General Hamilton rolls even and gets three movement segments. Sanborn's brigade is rushed down the Settlement Road and then formed into line of battle.


4:00 - 4:20 | Sullivan's Brigade is the second Union brigade to arrive on the table. They advance north in column of march along the Settlement Road. 


4:00 - 4:20 | Col. Jerimiah Sullivan oversees his brigade as they move on to the table.


4:20 – 4:40 | The Confederate Command uses its first two move cards to form its two brigades into a defensive line. Clarks Battery is the center of this line.


4:20-4:40 | On the Confederate left flank, the St. Louis Battery unlimbers on a ridge that overlooks the Bay Springs-Iuka Road. On the next Artillery fire power card, they open fire on Sullivan’s Brigade as they march up the road. The bombardment scores a hit on one of the regiments causing one unit integrity loss and disorder.


4:20 - 4:40 | Before the bombardment from the St. louis battery can cause anymore damage, General Sullivan rally's his disordered regiment and deploys his brigade into line of battle. 


4:20 - 4:40 | On the Union Left, Sanborn's brigade opens fire on the Confederate skirmishers. The fire forces one of the units to fall back disordered with 1 UI loss.

4:40 - 5:00 | The 17th Arkansas moves into position on the Confederate Left flank next to the St. Louis Battery 


4:40 - 5:00 | On the next Union movement card, Sanborn’s Brigade begins its attack on the Confederate line.


4:40 - 5:00 | The Union’s attack looking north.


4:40 - 5:00 | After the Federals complete their movement both sides choose to preform opportunity fire. The Confederates fire first. Their fire causes one Union regiment to rout. On the Bay Springs-Iuka/Settlement Rd intersection Clarks Battery fires into the advancing federals at close range. The fire is ineffective!


4:40 - 5:00 | The Union Brigade then returns fire. The 26th Missouri takes aim and fires at Clarks Battery. They score three hits and destroy the battery! The union fire also causes the 40th Mississippi to fall back disordered with one unit integrity loss. The Bay Springs-Iuka/Settlement Rd intersection is now undefended.  


5:00 [End of turn 1] Turn one ends after the Confederates completes their sequence deck. The Union side had three very critical cards remaining in their deck. They were, move, infantry fire and Melee. The loss of three cards could be critical to the outcome of the battle.

Part 2 Coming Soon


Sunday, February 10, 2013

The Battle of Chaplin Hills (Perryville).

Over the Christmas holiday, I had some free time, so I decided to refight the Battle of Perryville. I used the Chaplin Hills scenario from the “Guns at Gettysburg Scenarios book 1, Heartland” by Paul D. Stevenson. This scenario is based on the fighting for the forward positions in front of the Union left flank. The commanders are Brigadier General McCook (Union) and Major General Cheatham (confederate). Below are a few photos from this game.

Here’s a photo of the initial setup:

The objective of the game was to hold the greater number of high ground areas numbered 1 to 7 on the map above. If you’re wondering this game was played in regimental scale using my own rule set. Each stand of troops equals 80 men.

Initial setup: A view of the battle from the prospective of the 4th Indiana Artillery deployed on hill 5. Maney’s Confederate Infantry Brigade can be seen in the foreground at the fence line.

Initial setup from the Union right flank.

Turn two: Maney’s Confederate brigade attacks the Union troops holding Hill 1.

Turn two: Stewart’s Confederate Brigade advances across the open field in the center of the table. The Union troops consisting of the 79th Pennsylvania, 24th Illinois, and 33rd Ohio fire on the advancing Confederates from the cover of a stone wall.

The troop positions after turn 3.

Turn four: Field’s Confederate Brigade, consisting of the 1st, 8th, and 51st Tennessee regiments arrives on the Unions Left flank near hill 1.

Turn four: In the center of the table, Stewarts brigade begins to push back the Union regiments holding the stonewall

Troop positions after turn 5.

Turn Five: The combined attack of Fields and Maney’s brigades forces the Union infantry supporting Parsons Battery on hill 1 to fall back.


Turn Five: Despite losing its infantry support Parsons Battery decides to try to hold hill 1 alone. Ready the double canister!!!!


Turn Six: The Union center is shattered by the restless attack of Stewart’s brigade. The Union line is essentially split in two.


Troop positions after turn 7.

Turn seven: After a bloody assault, Fields brigade manages to destroy Parsons Battery and captures hill 1


I decided to call the game after turn seven. Besides the loss of hill 1, the union army had been split in half. To add to Union woes, General Terrill was mortally wounded on the final turn. I believe that the Union would have put up a much better fight if less of their regiments had not been green or militia grade troops. Oh well war is not fair.

Sunday, June 24, 2012

New battle report posted- The Battle of Fair Oaks (Seven Pines)

A few weeks ago I commemorated the 150th anniversary of the Battle of Fair Oaks by refighting the Fair Oaks Station part of the battle. To date this is the largest battle that I have run in terms of table size and the amount of figures used. It took me a few weeks to put the battle report together, but final here it is. Looking forward, my next large battle will probably be the Cornfield at Antietam. In the mean time, I also hope to do some smaller 1862 battles. So be on the lookout for these starting in July.

Thank for looking.

-Bryan

Battle Report: The Battle of Fair Oaks

.


Key words: ACW 10mm, American Civil War 10mm, Battle Report, Miniature Wargaming, Battle of Fair Oaks, Battle of Seven Pines

Monday, April 16, 2012

New battle report posted- The Battle of Shiloh Church (Sherman’s Stand)

Last weekend, I commemorated the 150th anniversary of the battle of Shiloh by refighting Sherman’s stand at the Shiloh Church. Below are a few images from the game. The battle report can be seen here: Link


Keywords: The Battle of Shiloh Wargame, Shiloh Church, Pendraken 10mm, ACW 10mm, American Civil War 10mm, Guns at Gettysburg Scenarios, Civil War Miniatures

Thursday, March 1, 2012

New Gallery: The Battle of Pea Ridge (First Day, March 7th, 1862)

Just in time for the 150th anniversary here are the photos from the Battle Pea Ridge game that I ran back in January. Below are some of my favorite photos from the game. The entire gallery can be seen here: The
Battle of Pea Ridge Gallery


Enjoy the photos


Key Words: ACW 10mm, American Civil War 10mm, The Battle of Pea Ridge, Elkhorn Tavern, Syracuse Wargaming

Wednesday, January 4, 2012

Battle of the Hornet’s Nest Game Gallery Added

Below are some photos from my most recent American Civil War game. The game was based on the fighting that occurred at the Hornet’s Nest during the Battle of Shiloh. The full Gallery can be seen here: The Hornet’s Nest (Shiloh 1862)


Key words: Battle of Shiloh, The Hornet’s nest, American Civil War 10mm, ACW 10mm, Rally Round the flag Rules, Guns at Gettysburg Scenarios book 2,